Making very large image resolution by tiling smaller bits.
The idea is to regard the graphic area as a window onto a much larger image- potentially thousands of pixels each way. Printed at 300 dpi they should look very sharp on screen and paper.

This was used to create large multi-mega-pixel images. In LB you can grab LB-written images in windows that are partly off screen, but if you have done things like fill with colours using a dll call this is not saveable. I have also found LB may misbehave, under Linux/Wine at least, if you try to create very large graphics windows on HD or HD+ screens.
Here I demonstrate how you can move the display window to show only part of a larger image, them stitch them into a large image.
I do the stitching with ImageMagick. This can be called programmatically from LB, but is just a one-liner from the command terminal. The example stitches three vertically displaced images, but it is easy to tile sideways AND vertically. E.g. 4x4 with 1000x1000 pixel images synthesises 4000x4000 pixels.
It is also possible to read the BMP file data from the adjacent images and put it back into a single image.
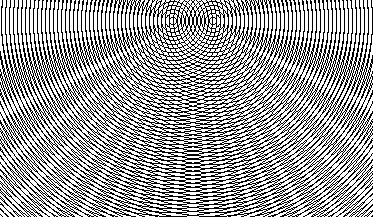
Following were produced while playing with this.. most use black boundaries, but it is easy to make boundary equal to the fill color.
This one was accidentally stitched bottom above top- and I filled a few areas by hand. I would normally do a programmatic fill.

And this one shows filled shapes, and why I generate sections outside the capture window, since otherwise the filling-from-centre may fill the image at one displacement that overlaps the viewing window, but not its other part in the next displacement along. ( Flood fill origin has to be in-window) Filled circles and rectangles are built in, but other shaped polygons have to use the GDI call.

LB code for one version
UpperLeftX   =   1
UpperLeftY   =   1

WindowWidth  =1130
WindowHeight = 650

nomainwin

graphicbox #w.g, 10, 10, 1100, 600

open "Tile BMPs of interfering  circles" for window as #w

#w   "trapclose [quit]"
#w.g "color black"
#w.g "size 1"

for vertical =0 to 2
    #w.g "cls"

    for radius =1500 to 0 step -4
        scan
        #w.g "up ; goto 530 "; 100 -vertical *500
        #w.g "down"
        #w.g "circle "; radius
        #w.g "up ; goto 570 "; 100 -vertical *500
        #w.g "down"
        #w.g "circle "; radius
    next radius

    #w.g "flush ; getbmp scr 50 50 1000 500"
    bmpsave "scr", "circlesBMP" +str$( vertical) +".bmp"
next vertical

    '   Use ImageMagick 'convert stitchBMP0.bmp stitchBMP1.bmp stitchBMP2.bmp -append appendedVertically.gif' to append vertically.
    '       '+append' for horizontal.
[quit]
    close #w
    end