Loading ALL image types, resizing, altering.
After choosing any image file, whatever its type and dimensions, LB calls IM and resizes it and saves as a bmp of the right size for the provided graphic box window.
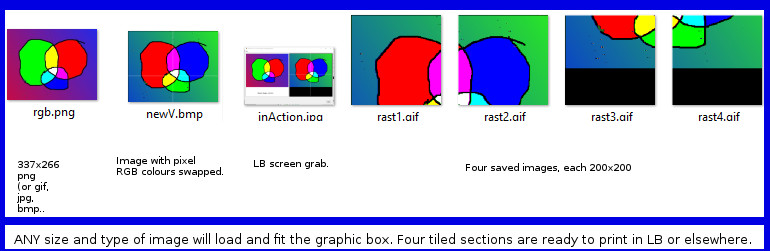
The RGP pixel data is stored in three 2D arrays for further processing in LB. In this case I swap around the RGB values into BRG, but you can as easily invert, or redraw in greyscale brightness, etc.
In the image at the head of page you see first the chosen PNG image loaded as a 400x400 bitmap, then its colours altered. I then save as four separate images so each can be printed on a printer sheet of paper then be tiled into a larger image for display.
    '                 ///////////////////        Rasto11D2.bas           \\\\\\\\\\\\\\\\\\\\\\

    '                                       tenochtitlanuk July 2018

    '   Requires you to have installed ImageMagick    http://www.imagemagick.org/script/index.php
    '   Loads an image of your choice and saves it broken up into smaller tiles.
    '       These are for printing on separate sheets of paper to tile a poster of large size.
    '   Program stores rgb( x, y) and you can show as brightness, or red-only, or w.h.y.


    nomainwin

    WindowWidth     =850
    WindowHeight    =550
    UpperLeftX      = 40
    UpperLeftY      = 10

    graphicbox #a.graph, 10,  10, 404, 410
    graphicbox #a.g2,   420,  10, 408, 410

    button     #a.b, "Quit", quit, LR,  40,  10

    menu       #a,   "&File", "&Open...", [openpic], | , "&Quit", quit

    dim pr( 400, 400), pg( 400, 400), pb( 400, 400)                 '   arrays to hold colour pixel data for processing.

    '   ------------------------------------------------------------------------------------------

    open "Rasto11Cb- convert images into huge posters" for window as #a

    #a.g2     "down"
    #a        "trapclose quit"
    #a.graph  "goto 70 380"

    #a.graph  "down"
    #a.graph  "\"; "Source image, resized 400x400."
    #a.g2     "fill black ; flush"

[begin]
    wait

    '   -------------------------------------------------------------------------------------------

[openpic]
    filedialog "Open image for processing", "*.png", filename$
    if filename$ ="" then goto [begin]
                                                                    '   Unlike LB, Imagemagick can load any graphic filetype.
                                                                    '       And can convert or process them very fast.
                                                                    '       Here, I convert chosen file to 400x400 size.
                                                                    '       This avoids all sort of scaling problems.
                                                                    '   \\ converts chosen.anyimagetype into 400x400 bmp //
    print filename$
    name$ =afterlast$( filename$, "\")
    print "Stripped file name: "; name$

'C:\Program Files\ImageMagick-7.0.8-Q16\convert.exe
    'file$  ="convert -sample 400x400 "; chr$(34); "E:\" +name$; chr$( 34); " "; chr$( 34); "D:\pic400x400.bmp"; chr$( 34)
    file$  ="convert -sample "; name$; " "; "E:\pic400x400.bmp"' use chr$(34) if spaces in filename..

    print "Command: "; file$
    print "cmd.exe /k "; file$

    run "cmd.exe /k "; file$, HIDE

    timer 5000, [carryon]
    wait
[carryon]
    timer 0

    loadbmp   "workimage", "E:\pic400x400.bmp"                      '   NB either or both of l & w will be 400... ie longest dimension fits exactly.
    bmpsave   "workimage", "scaledOriginal.bmp"
    #a.graph  "drawbmp workimage 1 3"
    #a.graph  "flush"
    unloadbmp "workimage"

    open "pic400x400.bmp" for input as #bmp                      '   BMP is now a string in memory...
        bi$ =input$( #bmp, LOF( #bmp))
    close #bmp

    w =asc( mid$( bi$, 19, 1)) +256 *asc( mid$( bi$, 20, 1))        '   lo byte at offset 18, ie string pos 19
    h =asc( mid$( bi$, 23, 1)) +256 *asc( mid$( bi$, 24, 1))        '   hi byte at offset 22, ie string pos 23

    o =( w *3) mod 4                                                '   Check how many bytes beyond a 4-byte block we are.

    pntr =137                                                       '   Points to start of data in a 24 bit bmp file.

    for y =1 to h                                                   '   Read the rows...
        for x =1 to w                                               '       ...and columns.
            '                                                           The bytes we want start at 54th, ie string position 55.
            '                                                           They are in blocks of 3, bgr. The end of each row of blocks is 4-byte aligned.
            '                                                           I save an array, but do not use it further in the present app.
            pb( x, y) =asc( mid$( bi$, pntr,   1))
            pg( x, y) =asc( mid$( bi$, pntr+1, 1))
            pr( x, y) =asc( mid$( bi$, pntr+2, 1))

            p =(0.299 *pr( x, y) +0.587 *pg( x, y) +0.114 *pb( x, y))'   Eye responsivity values
            '#a.g2  "color "; p; " "; p; " "; p
            #a.g2  "color "; pb( x, y); " "; pr( x, y); " "; pg( x, y)
            #a.g2  "set "; x +1; " "; 2 +h -y                       '   Draw the processed version- here in swapped colours' in brightness

            pntr =pntr +3

        next x

        scan

        if o <>0 then pntr =pntr +( 4 -o)   '                       '   Make 4-byte-aligned
    next y

    '                                                               '   Draw grid to show chosen sectional areas.
    #a.g2  "color white ; up ; goto 200 0 ; down ; line 200 0 200 400 ; up"
    #a.g2  "goto 0 200 ; down ; line 0 200 400 200"
    #a.g2  "flush"

    #a.g2  "getbmp newV     1    1   399  399" '                   '   Now we'll save the altered image...
    bmpsave "newV", "newV.bmp"

    #a.g2  "getbmp rast1     1    1   199  199" '                   '   Now we'll save the image in 4 panels...

    bmpsave "rast1", "rast1.bmp"                                 '   First, top left panel
        file$  ="convert rast1.bmp rast1.gif"                 '   Calling Imagemagick to convert file bmp to gif.
        run "cmd.exe /k "; chr$( 34); file$; chr$( 34), HIDE

    #a.g2  "getbmp rast2   200    1   199  199"
    bmpsave "rast2", "rast2.bmp"
        file$  ="convert rast2.bmp rast2.gif"
        run "cmd.exe /k "; chr$( 34); file$; chr$( 34), HIDE

    #a.g2  "getbmp rast3     1  200   199  199"

    bmpsave "rast3", "rast3.bmp"
        file$  ="convert rast3.bmp rast3.gif"
        run "cmd.exe /k "; chr$( 34); file$; chr$( 34), HIDE

    #a.g2  "getbmp rast4   200  200   199  199"
    bmpsave "rast4", "rast4.bmp"
        file$  ="convert rast4.bmp rast4.gif"
        run "cmd.exe /k "; chr$( 34); file$; chr$( 34), HIDE

    timer 3000, [carryon2]   '                                     '    Allow time for all to complete, then delete bmp versions
    wait
  [carryon2]
    timer 0

    kill "rast1.bmp" '                                          '    Can now safely delete the bmp versions.
    kill "rast2.bmp"
    kill "rast3.bmp"
    kill "rast4.bmp"
    wait

sub quit h$
    close #a
    timer 0 '                                                      '    So timer does not keep firing if interrupted or ended.
    end
end sub